Overview
The Unused Devices report identifies any users and channels that haven't been utilised in a given period of time. It is useful for identifying telephone handsets that can be safely reallocated to other users or which channels are no longer used.
Running the report
Click on the Reports tab and select Account summary from the left-hand pane. The screen displaying the parameters of the report will appear, where you can configure the entity, period, filters, options and format of the report.
For details about how to configure these parameters, refer to the relevant page in the list below:
Creating the report
When you have configured the report's parameters, click on the button to run the report immediately; alternatively, you can save the report's definition or schedule the report for future delivery.

The report's results
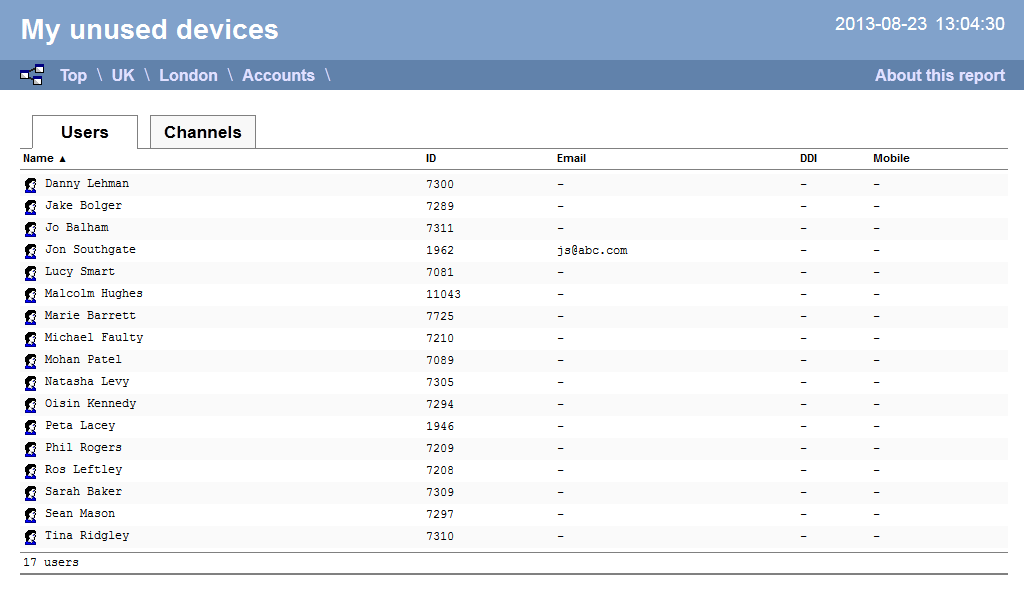
Below is an example of this report's output in Web format, showing both unused users and unused channels:
The Web format is the most interactive of all formats: all column headers are click-sortable and most graphical and tabular elements can be drilled down into, allowing deeper analysis of your results. By clicking on the About this report link at the top-right corner of the page, you can review any filters and options that have been applied to the report.
As with all reports produced by TIM Plus, each page of the report includes the following information:
- the report's title
- the date and time that the report was generated
- the name of the report, if applicable
The results will display as a paginated list of unused devices with each type of device being grouped in its own tab:
The Users tab shows the following information:
| Header | Description |
|---|---|
| Name | The name of the user |
| ID | The extension number associated with the user |
| The e-mail address associated with the user | |
| DDI | The DDI associated with the user, if available |
| Mobile | The mobile number associated with the user, if available |
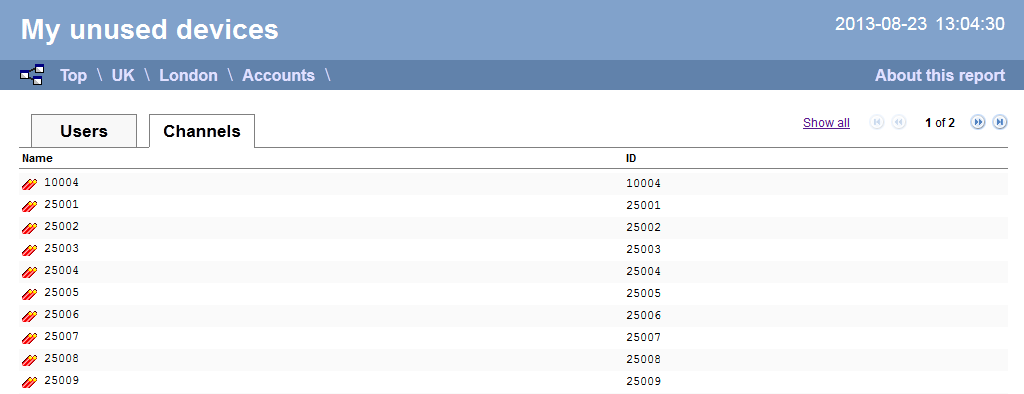
The Channels tab shows the following information:
| Header | Description |
|---|---|
| Name | The name of the channel |
| ID | The ID associated with the channel |
To modify your report to cover a larger organisational scope, click on an element of the breadcrumb as shown below:

Introduction
Quickly identify any unused devices on any entity i.e. site, team group etc. This is useful for finding channels no longer required or extensions that can be reallocated elsewhere.
The report shows two sections; Users and Channels. The tab displays a list of all users that haven't been utilised over the given report period. The tab displays a list of all channels that haven't been utilised over the given report period.

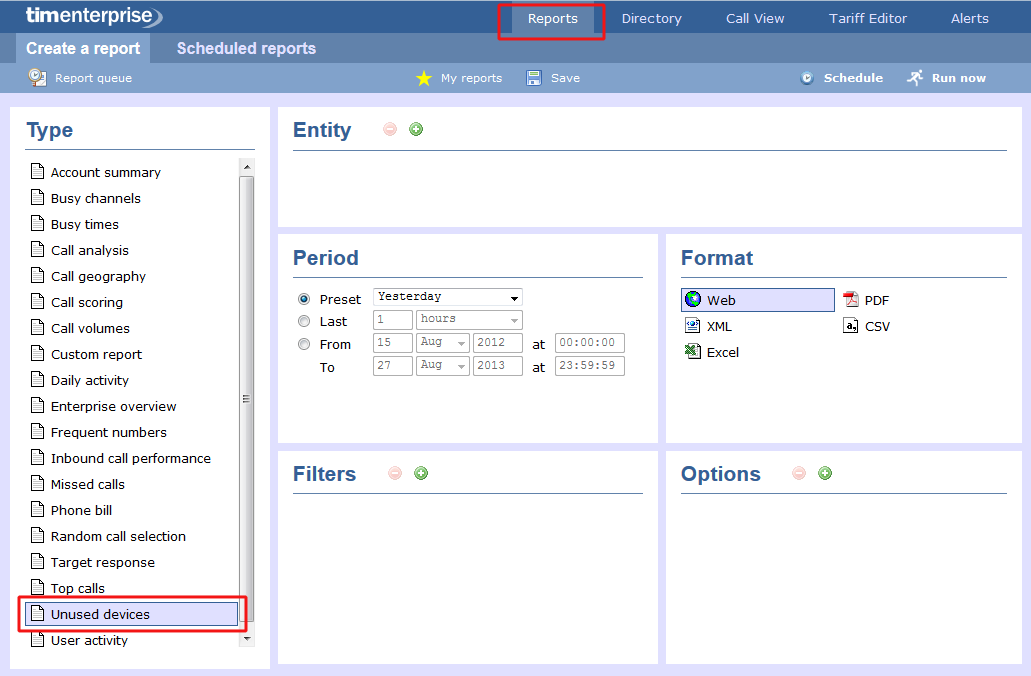
Running the report
On the Reports screen, click on Unused devices in the reports type list, as shown below:

You can tailor the report to your specific requirements by selecting the entity you'd like to apply the report to as well as the output format required. You can also limit the results by adding filters and options as detailed below:
Entity
The Entity allows you to choose which area of the directory you would like to report on. If you want to run a report for your entire organisation, you do not need to choose an entity.
If you want to select a specific area for reporting, click on the
 button to get a pop-up window showing the areas of the directory you can report on.

To drill up and down simply click on the hyperlinks provided, shown in the screenshot below as Aberdeen, Birmingham, Brighton, Cardiff etc.

Once you have reached the area you would like to report on, click on the green
 as highlighted in red below.

Alternatively if you are looking for a specific area e.g. person,
department, site, name etc, you can just enter the name and press the
 button as shown in the example below:

Selected Entity
Once your entity you would like to report on had been selected, it will appear, as shown below:

Delete an Entity
In order to delete an entity, just select it with your mouse and click on the  button above it, as shown below:

NOTE: If you have restricted access, you may not be able to see the entire directory. You will need to speak to your system administrator to get access rights to other areas. |
Period
TIM Enterprise allows complete flexibility in the way you can select your time periods.

You have three types of period to select from. These are:
- Preset period
- Last period
- Custom period
NOTE: Running this report over longer periods increases the reliability of its results. |
Preset period
The standard Preset periods are shown below and can be selected from this simple drop-down list.

The built-in periods are based on a standard Gregorian calendar and are defined as follows:
| Period | Description |
|---|---|
| Today | The start date and end date is set to the current date. The default start time is set to 00:00:00 and the end time to the current time. |
| Yesterday | The start date and end date is set to the current date minus one day. The start time is set to 00:00:00 and the end time to 23:59:59. |
| This week | The start date is set to the Monday of the current week, whilst the end date is set to the current day. The default start time is set to 00:00:00 and the end time to the current time. |
| Last week | This is Monday to Sunday of the previous week. The start time is set to 00:00:00 and the end time to 23:59:59. |
| This month | The start date is set to the 1st day of the current month and the end date to today. The default start time is set to 00:00:00 and the end time to the current time. |
| Last month | The start date for this period is set in three stages. The day is set to 01, the month is set to the current month minus one, or in the case of January, it is set to 12. The year is set to the current year, unless it is a new year, in which case the year is reduced by one. The start and end times are set to 00:00:00 and 23:59:59 respectively. |
| This year | The start date is set to the first day of the first month of the current year. The end date is set to today's date. The start and end times are set to 00:00:00 and 23:59:59 respectively. |
| All calls | The start date is set to the date of the first call in the database, whilst the end date is set to the date of the most recent call in the database. Times are also set to the times of the first and last calls in the database. |
Last period
The last period allows complete flexibility, e.g. last 3 hours, last 7 days, last 2 quarters.

NOTE: We define last week from the pre-set periods as Sun-Sat of the previous week and last 7 days as the preceding 7 days. |
Custom period
The user defined custom period allows the user to define the exact date and time that the report is required from and to.

Format
This allows you to define the format of the output. Simply click on your preferred output format to determine whether you would like the report output in Web format, to PDF, CSV, as XML or Excel.

To select, simply click on your chosen format from the list as shown above. Note that any report can be run several times with different formats selected for the output if required.
| Format | Description |
|---|---|
| When a report is run, its output is displayed in the Report Output
window, which is a mini web-browser containing the HTML output generated
by the report engine. It is the common interface for all reports. The
report body is shown in a window that can be panned around by using the
horizontal and vertical scrollbars. If the report is made up of
multiple pages, you can navigate it by using the and buttons at
the bottom. You can print the report by pressing the button, or
save the report to an HTML file by pressing the button and choosing
a filename and location.
Universally-accessible, this format provides clickable column headers for dynamic sorting of table data, with clean graphical charts in the popular Flash format, so you can zoom into them for more detail. Each report is fully customisable - right down to the individual table fields. To view these reports, all that's needed is your favourite web browser - with no need for obscure add-ons! |
|
(Portable Document Format) |
PDF is a file format created by Adobe Systems in 1993 for document
exchange. PDF is used for representing two-dimensional documents in a
manner independent of the application software, hardware, and operating
system.
PDFs will run over several pages depending on the report selected. Because of the nature of PDF reports, headers are fixed and not selectable as in web reports above. You may however pre-sort before running or scheduling using the filters available in the Options section. PDFs are ideal for producing reports like Phone Bills. PDFs are ideal when distributing to colleagues inside and outside of your organisation - while guaranteeing they'll look identical across all operating systems when viewed on the screen or printed out. |
(Extensible Markup Language) |
XMLs purpose is to aid information systems in sharing structured data,
especially via the internet, to encode documents and to serialise data. XML, in combination with other standards, makes it possible to define
the content of a document separately from its formatting, making it easy
to reuse that content in other applications or for other presentation
environments. Most importantly, XML provides a basic syntax that can be
used to share information between different kinds of computers,
different applications, and different organizations without needing to
pass through many layers of conversion.
Since all reports are derived from this native format, we pack each one with all the data you'd ever need, so you'll always be able to extract the report data into your favourite reporting packages, such as Business Objects, Crystal Reports, or even your favourite Office spreadsheet. |
(Comma Separated Values) |
A CSV file is used for the digital storage of data structured in a table
of lists form, where each associated item (member) in a group is in
association with others also separated by the commas of its set. Each
line in the CSV file corresponds to a row in the table. Within a line,
fields are separated by commas, each field belonging to one table
column. CSV files are often used for moving tabular data between two
different computer programs, for example between a database program and a
spreadsheet program.
This option is ideal for interacting with your own back office systems, all CSV data is fully customisable using XSLT from the report's original XML format. |
| Select Excel as your preferred report format, if you would like to manipulate the data and possibly integrate with data in other Excel spreadsheets. |
Filters
The filters option allows you to add one or more filters to the report to allow you to sift through information in more detail.
Seeing from the screenshot below, the button is deactivated, meaning you can not add filters to this report.

Options
Unlike Filters, this report does have a lot of Options. The options available for the Unused devices report are shown below:

Upon selecting the Option, then click on the button to add this option or just select the button if you no longer want to include this Option.
A list with the available options for the Unused devices report can be seen below:
Sort results by
When running this report, you may want to order the results to suit. You can select the criteria by which you want to order the results from the list as shown below:

- Name: The device or channel name.
- ID: The device or channel ID.
- Email: The e-mail address associated with the user.
- DDI: The Direct dial inwards number (DDI) associated with the user.
- Mobile: The mobile number associated with the user.
Once your option is selected, press the button to add it to the report.
Sort order
Decide if you would like the results displayed in ascending or descending order.

You may choose to order the results in either ascending or descending order. Note that all web reports have clickable headers so you can reorder on-the-fly. However for other report formats e.g. PDF, it's best to decide on the Sort order before running.
- Ascending: :Results are ordered lowest first
- Descending: Results are ordered highest first
Once your option is selected, press the button to add it to the report.
Audio only
This option allows you to display only calls that have an associated voice recording in the results.

As shown above, you have the following two options:
- Yes: The report results will only show calls with an audio file attached
- No: The report excludes all calls with audio attached
Once your option is selected, press the button to add it to the report.
Notes only
This option allows you to display only calls that have an associated note in the results.

As shown above, you have the following two options:
- Yes: The report results will only show calls with a note attached
- No: The report excludes all calls with a note attached
Once your option is selected, press the button to add it to the report.
Scored only
This option allows you to limit the search to scored calls only.

As shown above, you have the following two options:
- Yes: The report results will only show calls with a score attached i.e. calls that have been scored
- No: The report excludes all calls with a score attached. i.e. all calls that have not been scored
Once your option is selected, press the button to add it to the report.
Show "Do not log"
It can be ocasionally possible to report on calls for users that have been set to "Do not log" in reports.
When the "Do not log" option is selected, calls are NOT logged and the associated recording are NOT available so you can NEVER report on these calls.
When the "Do not record" option only is selected, calls are still logged but the recording are available (when line-side recording in place) for 24 hours as default. That 24 hour period can be reduced. The wait time is a system-wide setting that can be altered in the Registry so could be reduced if required.

Once your option is selected, press the button to add it to the report.
Added Options
Once your options are added, they will appear under the Options section, as shown below:

Delete an Option
In order to delete an option, just select it with your mouse and click on the button above it, as shown below:

NOTE: You may add more than one Option to any report. |
Creating the report
When you have chosen a reporting period, and are happy with your selections, you have two options:
- Run the report now
- Schedule for future delivery
To choose your preferred option, select the appropriate button.
If you choose to run the report now, click the button, as shown below. The results will appear immediately in your chosen format.

To schedule the report for delivery at a later date, follow the instruction given on the Schedule a report section.
Unused devices - The results
When selecting Web as the output format, this report will appear as below.
The Web format allows for complete flexibility when viewing any report. To view details of any filters or selection parameters used in creating this report, simply click on About this report at the top right of the page.
As with all reports, the header of the report includes the report title, any name you may have given to it, and the date and time it was run.

All headers are clickable allowing you re-arrange the report layout in seconds, to sort the calls in ascending or decending order based on the header clicked.
The headers of this report are as follows:
| Header | Description |
|---|---|
| Name | The Name of any unused user or channel will appear. e.g. Joe Bloggs or Main ISDN. |
| ID | The ID of any unused user or channel will appear. e.g. Ext 278 or 13578. |
| If the user has an associated e-mail address in the directory, it will appear here. | |
| DDI | If the user has an associated DDI (Direct Dial No) in the directory, it will appear here. |
| Mobile | If the user has a mobile number associated with it in the directory, it will appear here. |
The Name and any associated ID for any unused user or channel will appear. If additional properties have been added e.g. E-mail, DDI, Mobile etc. these properties will be displayed also.
If you would like to go back and view any report for a larger section of the organisation, simply click on the appropriate link in the breadcrumb as shown below:
