These instructions help you configure your Cisco UCM version 5.0 - 8.6 to work with TIM Plus. Contact your system maintainer if you are not familiar with the configuration of your PBX.
Connection Type
Support Files
Required Tasks
Configuring your Cisco UCM
Create Cisco Application User for AXL sync
To enable TIM Plus to query the Cisco database, you need to create an Application User on your Cisco UCM. Follow the steps below to complete this task:
- Connect to the web management interface of your UCM node and select Cisco Unified CM Administration from the Navigation drop-down list.
- Log in to the system and click from the main menu. Select from the drop-down list.
Click to create a new user:
User ID: TIM_AXL
Password:C1sco
Confirm Password:C1sco


The credentials above are shown as an example. In the interests of security, you should choose your own values.
- Scroll down to the Permissions Information section and click .
- In the new window, enter Standard Tab and then click . Tick the Standard TabSync User box, and then click on the tab.

- Click to apply the settings.
Set up FTP/SFTP in Cisco UCM
You will need to configure your Cisco UCM to send the CDR data to TIM Plus. Note that the UCM can be configured with cluster wide or server specific settings, depending on how the system maintainer has installed it. Please note that, by default, CDR records are turned off.
- Log in to Cisco UCM Administration and from the left-hand menu click on the tab and select .
- Choose your UCM node from the Server drop-down list.
- Select Cisco Call Manager from the Service drop-down list.
- In the System section, change the CDR Enabled Flag to True. Enable this parameter on all servers within the cluster you want to log calls for.
- Change the CDR Log Calls with Zero Duration Flag to True. This parameter enables or disables the logging of CDRs for calls which did not connect.
- Click on the button.
- Click on the Navigation drop-down list from the top right-hand corner, and select Cisco Unified Serviceability. You may need to log in with a user account that has administrative permissions.
- Select , then click on the tab.
- Click the button. You will now see the Billing Application Server Parameters window. Enter the following parameters:
Host Name / IP Address: The IP address or hostname of the machine running TIM Plus.
User Name: Enter a user name for FTP/SFTP transfers (e.g. TIM)
Password: Enter a password for the FTP account (e.g. Ciscoftp)
Protocol: Select FTP or SFTP as desired.
Directory Path: Enter a forward-slash character to indicate root (/).
Remove the tick from Resend on Failure.
- Next, click on the button to complete the billing server configuration. The UCM node will check that the FTP/SFTP details are valid and will write a test file to the FTP/SFTP directory. If this fails, you should double-check the details you entered.
Configuring Cisco AXL sync
Follow the steps below to configure TIM Enterprise to synchronise with the directory of your Cisco UCM:
- Click on the tab.
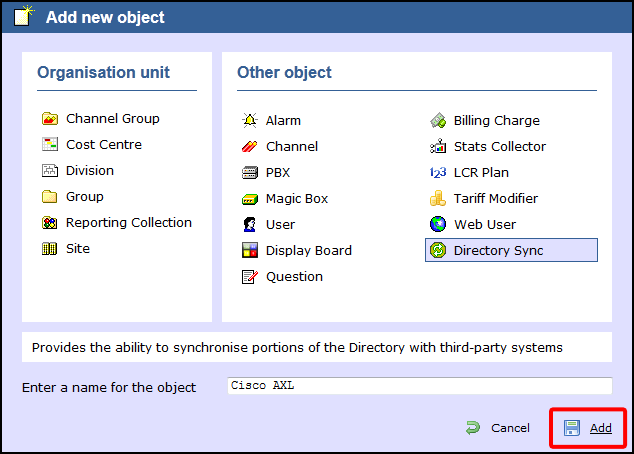
- Go to the Directory level where you want the synched files to be created and add a new Directory Sync object. Enter a name for the object and click on the button, as shown below:
- Left-click on the newly-created object and select .
- In the Directory type drop-down list select Cisco UCM.
- In the Host name field enter the IP address of the UCM Publisher node.
- In the Username field, enter the username of the Cisco Application User you configured in the previous section, e.g. TIM_AXL.
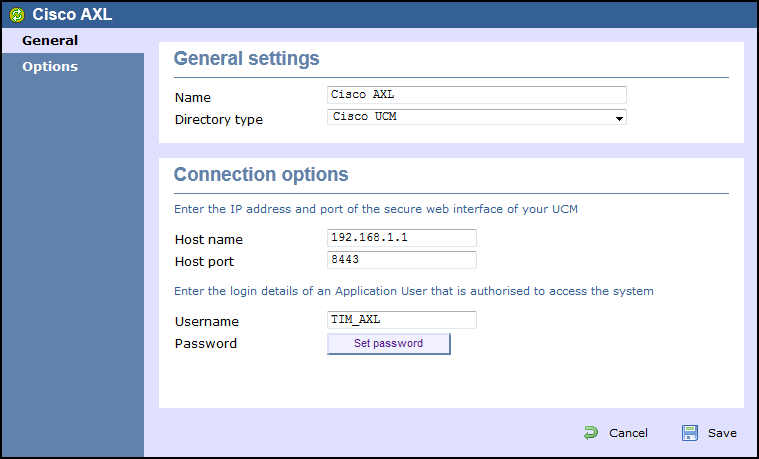
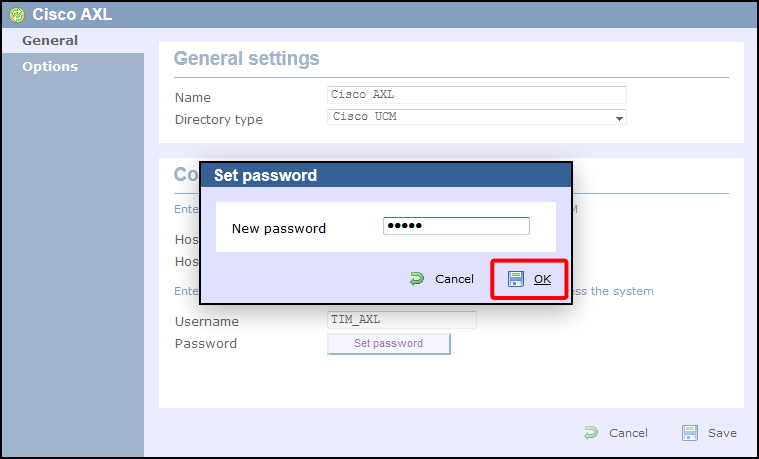
- Click and enter the password configured in the previous section, e.g. C1sco.
Follow these instructions to configure your Cisco UCM / CUBE to work with TIM Enterprise:
| Connection information | Description |
|---|---|
| Connection type | FTP or SFTP |
| Connection method | The Cisco UCM will send the CDR data to TIM Enterprise via FTP or SFTP |
Tasks required:
- Download and configure interface file UCM.zip
- Create an Application User on your UCM for AXL synchronisation
- Configure TIM Enterprise to receive data from your UCM
- Create a synchronisation object in TIM Enterprise
- Setup FTP/SFTP on the UCM to transfer CDRs to TIM Enterprise
1. Download and configure interface file UCM.zip
- Log in to the Tri-Line Gateway to download the specific interface file that enables TIM Enterprise to communicate with your UCM, as shown below:
- Extract the Cisco UCM.zip file to the C:\Program Files\Tri-Line\TIM Enterprise\config\ folder. The ZIP file contains two files: Cisco UCM.TDT and Cisco UCM.TDS.

2. Create an Application User on your UCM for AXL synchronisation
So that TIM Enterprise can automatically log in to your UCM and perform synchronisation commands, you need to create an Application User, as shown below:-
- Connect to your UCM node, select Cisco Unified CM Administration from the Navigation drop down list on the right and click .
- Login to the system, select from the menu and click .
- Click from the menu.
- Enter in the following details:
- User ID: Enter a username e.g TIM_AXL
- Password: Enter a password e.g C1sco
- Confirm Password: Repeat the password e.g C1sco
- Scroll down to the Permissions Information section and click .
- In the new window, enter Standard Tab and then click . Tick on Standard TabSync User and click , followed by .
3. Configure TIM Enterprise to receive data from your UCM
Follow these steps to create a PBX object and configure the CDR transfer method in the TIM Enterprise Directory:
- Browse to TIM Enterprise and login with your credentials.
- Click on the tab.
- Go the the point in the Directory where you need to add the PBX Object and add a PBX with the name Cisco UCM.
- Left-click on it and select .
- From the settings tab select Cisco UCM 5+ from the PBX model list and enable the local backup.
- In the tab select Receive FTP transfers from PBX from the Connection method list.
- In the Username field enter in the username of your choice e.g. Cisco.
- In the Password field enter in the password of your choice e.g. C1sco.
- Finally, click on the button.


4. Create a synchronisation object in TIM Enterprise
Follow these steps to set up a synchronisation object in TIM Enterprise which will regularly check for name and extension changes on your UCM and replicate them in your TIM Enterprise directory:
- Browse to TIM Enterprise as normal and login with your credentials.
- Click on the tab.
- Go to the point in the Directory where you need to synchronise and add a new Directory Sync object with an appropriate description e.g. Cisco AXL.
- Left-click on it and select .
- In the Directory type drop-down list select Cisco UCM.
- In the Host name field enter in the IP address or Hostname of Publisher node.
- In the Username field enter in the username configured in phase 2. Creating Cisco Application User for AXL sync, e.g. TIM_AXL.
- Click and enter the password configured in phase 2. Creating Cisco Application User for AXL sync, e.g. C1sco, followed by clicking .
- Finally, click on the button.


TIM Enterprise will now connect to the PBX and sync the directory objects.
5. Setup FTP/SFTP on the UCM to transfer CDRs to TIM Enterprise
You will need to configure your Cisco UCM to send the CDR data to TIM Enterprise. Note that the UCM can be configured with cluster wide or server specific settings depending on how the system maintainer has installed it. Please note that by default CDR records are turned off.
- Login to Cisco UCM Administration and choose , which is located on the left hand side of the screen.
- Select your UCM node from the Server drop down list.
- Select Cisco Call Manager from the Service drop down list.
- In the System section, change the CDR Enabled Flag to True, enable this parameter on all servers in the cluster that you want to log calls for.
- Change the CDR Log Calls with Zero Duration Flag to True(This parameter enables or disables the logging of CDRs for calls which were never connected or which lasted 1 second).
- Click on the button.
- Click on the Navigation drop-down list in the top right hand corner and select Cisco Unified Serviceability.
- You may be prompted to login with a user account with Administrative permissions. If so, login with such an account.
- Select then click .
- Click button. You will now see the Billing Application Server Parameters window.
- Enter the following parameters:
- Host Name/IP Address: The IP address or hostname of the machine running TIM Enterprise.
- User Name: as configured within phase 3. Configuring TIM Enterprise to receive data from UCM e.g. Cisco.
- Password: as configured within phase 3. Configuring TIM Enterprise to receive data from UCM e.g. C1sco.
- Protocol: Select FTP or SFTP as configured above.
- Directory Path: Enter /.
- Remove the tick from Resend on Failure.
- Now click on the button to complete the Billing Server configuration. The UCM node will check that the FTP/SFTP details are correct and will write a test file to the FTP/SFTP directory.
- If it fails, you should check the FTP or SFTP details, configured above.
You have now completed the configuration.
NOTE: If you have more than one server in your cluster you must repeat Steps 1 to 5 for each node. This will enable the UCM nodes to start creating CDR records, which are stored on the Publisher Node. |