These instructions help you configure your Avaya BCM phone system (up to v3.x) to work with TIM Enterprise. Contact your system maintainer if you are not familiar with the configuration of your PBX.
Connection Type
Support Files
Required Tasks
Configuring your SMDR output
Follow the steps below to configure your Avaya BCM (up to v3.x) to output SMDR to TIM Plus:
- Open your Business Communications Manager Unified Manager.
- Click on the tree node.
- Click on the node.
- On the right-hand panel the Summary window will appear. Ensure that Up is selected in the Status drop-down list.
Select the tree node and configure the fields as shown below:
SMDR field Value Format Norstar Report Type All Language English Report Filter All Select the tree node and configure the fields as shown below:
SMDR field Value Date Format MM/DD/YY Header Format Line/Station DNIS Info Enabled Connection Char Leave as default Clip File Schedule Leave as default Clip File Size Leave as default CDR Disk Space Limit Leave as default - For the settings, please leave as the system defaults.
- For the setting please leave as the system defaults.
- Once you have completed the above changes, choose from the file menu.
Creating a CDR User
To enable TIM Plus to connect to your Avaya BCM you will need to create a CDR User in the option of your BCM Unified Manager configuration utility. The Avaya BCM connection requires the DCOM service to be enabled on the machine running TIM Plus. Following the introduction of enhanced security in Windows XP Service Pack 2, the username and password for the CDR User now need to be exactly the same as the credentials of the Windows account under which TIM Plus runs.
Configuring TIM Enterprise
Follow the steps below to configure TIM Enterprise to collect the SMDR data from your Alcatel OmniPCX Enterprise:
- Click on the tab.
- Choose the PBX object you want to configure and click Properties.
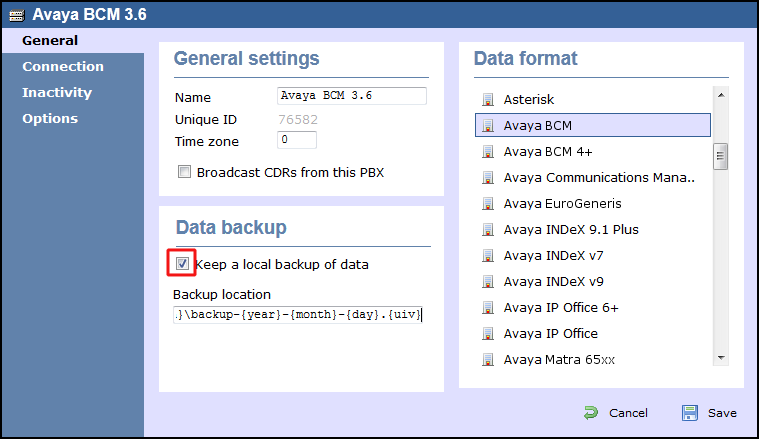
- A new window will open. In the tab, select Avaya BCM from the Data format list and tick the Keep a local backup of data box, as shown below:
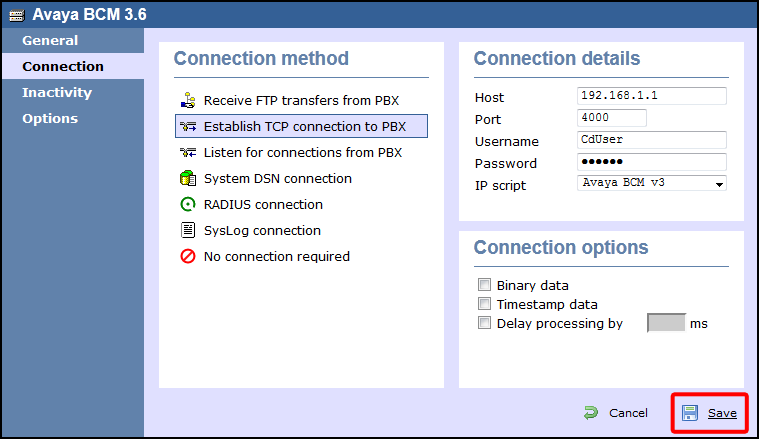
- In the tab, select Establish TCP connection to PBX from the Connection method list.
- In the Host field, enter the IP Address of your Avaya BCM.
- In the Port field enter in 4000.
- n the Username field, enter the username of the CDR user you configured with the BCM Unified Manager (above).
- In the Password field, enter the password associated with the CDR user.
- In the IP script field select Avaya BCM v3 from the drop-down list
- Click on the button to apply the changes.
These instructions should assist in configuring your Avaya BCM to work with TIM Enterprise. If you are not familiar with PBX configuration, please contact your system maintainer.
| Connection information | Description |
|---|---|
| Connection type | IP: The Avaya BCM v3.x CDR information is sent via TCP/IP. The actual installation of TIM Enterprise can be anywhere on the network that the PBX is connected to. |
| IP method | TIM Enterprise will connect to the IP address of your Avaya BCM v3.x. |
Configuring your SMDR
Below you will find instructions on how to configure your Avaya BCM up to v3.x to output SMDR to TIM Enterprise:
- Open your Business Communications Manager Unified Manager.
- Click on .
- Click on .
- On the right-hand side the Summary window will appear. Make sure that the Status is up. If it isn't click on the Status drop-down list and select Up.
- Now on the left-hand side click on and configure the fields as per below:
- On the left-hand side click on and configure the fields as per below:
- For the settings, please leave as the system defaults.
- For the setting please leave as the system defaults.
- Once you have completed the above changes, click on in the file menu and then click on .
| SMDR field | Value |
|---|---|
| Format | Norstar |
| Report Type | All |
| Language | English |
| Report Filter | All |
| SMDR field | Value |
|---|---|
| Date Format | MM/DD/YY |
| Header Format | Line/Station |
| DNIS Info | Enabled |
| Connection Char | Leave as default |
| Clip File Schedule | Leave as default |
| Clip File Size | Leave as default |
| CDR Disk Space Limit | Leave as default |
CDR User
For TIM Enterprise to connect to the Avaya BCM v3.x you will need to create a CDR User on it. This can be done in the Business Communications Manager Unified Manager appliction, under the options.
The Avaya BCM v3.x connection requires TIM Enterprise to use the Microsoft DCOM object. Microsoft has increased the security in DCOM after Windows XP Service Pack 2. If you are using Windows XP Service Pack 2+ you will need to make sure that the username and password are set as exactly as the same the Windows username and password.
Configuring TIM Enterprise
Below you will find steps on how to configure TIM Enterprise to listen for SMDR data from your Avaya BCM 3.6:
- Browse to TIM Enterprise as normal and login with your credentials.
- Click on the tab.
- Go the the point in the Directory where you need to add the PBX Object and add a PBX with the name 'Avaya BCM 3.6'.
- Left-click on it and select .
- From the settings tab select your Avaya BCM family PBX model from the list.
- In the tab select Establish TCP connection to PBX from the Connection method list.
- In the Host field enter the IP Address of your Avaya BCM.
- In the Port field enter in 4000.
- Enter Username and Password.
- In the IP script field select Avaya BCM v3 from the drop-down list.
- Finally, click on the button.

