These instructions describe how to connect your TIM Plus system to a Microsoft Teams account, allowing you to analyse your Teams calls in the same way as standard phone calls.
Connection Type
Support Files
Required Tasks
Add a new data source
Connecting TIM Plus to your Microsoft Teams account is very similar to the way you connect to any other PBX or communications service:-
- Go to the Directory tab, click on Sites and select Add
Configure the new data source
Click on the newly-added data source object in the directory list, then choose Properties from the pop-up menu in order to configure the data source:-
- Open Windows Control Panel and select the icon
Double-click on the icon to open the ODBC Data Source Administrator window

For a 64 bit system, access the ODBC Data Source Administrator from the following location C:\Windows\SysWOW64\odbcad32.exe
- Click on the tab.
- Click on the button.
- Select SQL Native Client from the driver list and click .
- In the Name field, enter lync.
- In the Description field, enter TIM Plus link to LcsCDR.
- In the Server field, enter the IP address or hostname of your Monitoring Server.
- In the Username field, enter the username for your LcsCDR database.
- In the Password field, enter the password for your LcsCDR database.
- In the Database drop-down list, select LcsCDR.
- Click on the button to confirm the information you entered is correct and that the connection is successful.
- Click on the button to close the window.
An example of an ODBC entry is shown below:

Configuring TIM Plus
Once the DSN connection has been set up, log in to TIM Plus and perform the steps below:
- Click on the tab.
- Choose the site you want to configure and click .
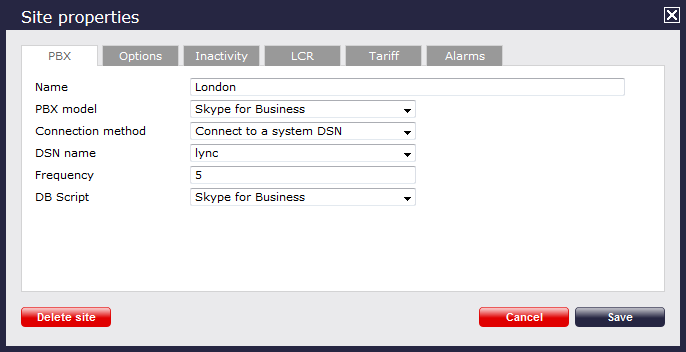
- In the Site Properties window, select Skype for Business from the PBX model drop-down list.
- In the Connection method field, select Connect to a system DSN from the drop-down list.
- In the DSN name field, select lync from the drop-down list.
- In the Frequency field, enter 5.
- In the DB script field, select Skype for Business from the drop-down list.
- Click on the button to apply the settings.