These instructions help you configure your Siemens OpenOffice phone system to work with TIM Plus. Contact your system maintainer if you are not familiar with the configuration of your PBX.
Connection Type
Support Files
Required Tasks
Configuring your SMDR output
By default, the SMDR output of a Siemens OpenOffice is not enabled. Contact your system maintainer to enable it for incoming, outgoing and internal calls.
Setting up a DSN connection
To enable TIM Plus to work with the Siemens OpenOffice, you first need to set up a DSN connection, by following the steps below:
- Open Windows Control Panel.
- Double-click on the icon.
- Double-click on the icon.
- Click on the tab.
- Click on the button.
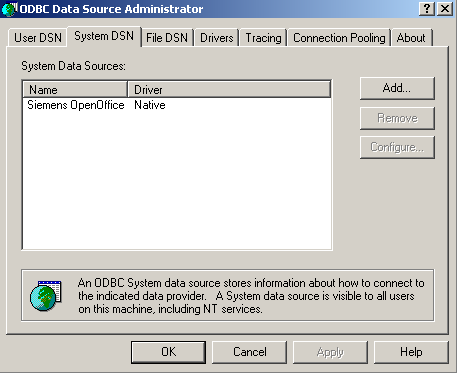
- Select Native from the driver list and click .
- In the Data source name field enter Siemens OpenOffice.
- Click on the button to save the changes.
An example of an ODBC entry is shown below:
Configuring TIM Plus
Once the DSN connection has been set up, log in to TIM Plus and follow the steps below:
- Click on the tab.
- Choose the site you want to configure and click .
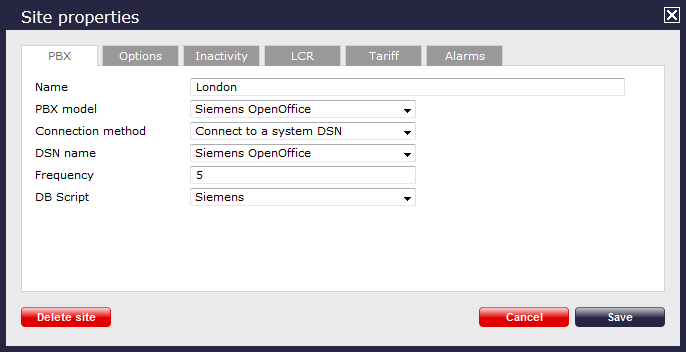
- In the Site Properties window, select Siemens OpenOffice from the PBX model drop-down list.
- In the Connection method field, select Connect to a system DSN from the drop-down list.
- In the DSN name field, select Siemens OpenOffice from the drop-down list.
- In the Frequency field, enter 5.
- In the DB script field, select Siemens from the drop-down list.
- Click on the button to apply the settings.
Labels: