These instructions help you configure your SwyxWare phone system to work with TIM Enterprise. Contact your system maintainer if you are not familiar with the configuration of your PBX.
Connection Type
Support Files
Required Tasks
Configuring your SMDR output
Follow the steps below to configure the SwyxWare to output SMDR data to a file in a specific location:
- Log in to your SwyxWare Administration Tool.
- Right-click on the Swyx server you want to configure and click on the button.
- In the Properties window, click on the tab.
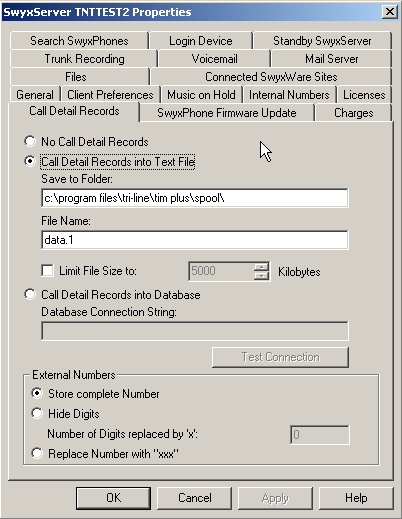
- Click on the Call Detail Records into Text File radio button.
- In the Save to Folder field, enter \program files\tri-line\tim Enterprise\spool\. If you are using a mapped drive enter the driver letter.
- In the File Name field, enter data.{sitecode}, replacing {sitecode} with the ID of the site you are logging. To obtain the ID of a site, hover the mouse pointer over it on the page in TIM Enterprise and it will be displayed as a tooltip.
- Click on the button and close the SwyxWare Administration Tool.
Here is an example of the SwyxWare Administration properties window:
Configuring TIM Enterprise
Follow the steps below to configure TIM Enterprise to receive SMDR data from your SwyxWare:
- Click on the tab.
- Choose the PBX object you want to configure and click Properties.
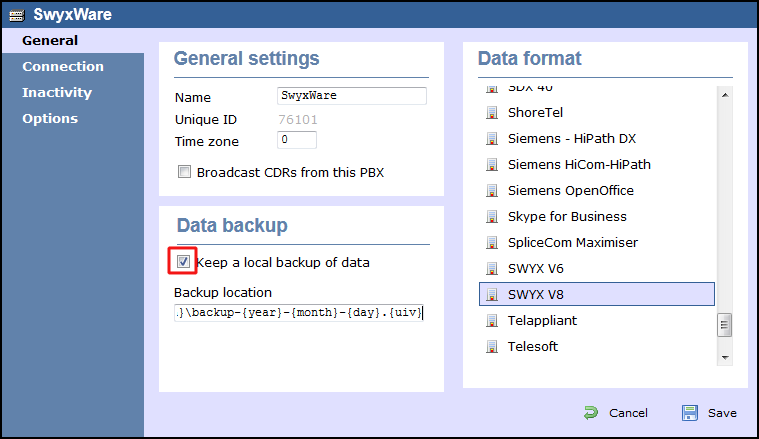
- A new window will open. In the tab, select SWYX V6 from the Data format list and tick the Keep a local backup of data box, as shown below:
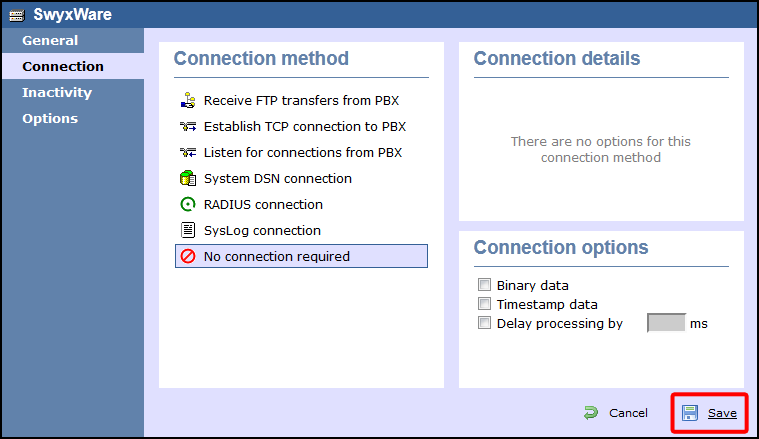
- In the tab, select No connection required from the Connection method list.
- Click on the button to apply the settings.
These instructions should assist in configuring your SwyxWare to work with TIM Enterprise. If you are not familiar with PBX configuration, please contact your system maintainer.
| Connection information | Description |
|---|---|
| Connection type | File |
| IP method | Swyx - File output:
The SwyxWare will output the CDR information to a file. TIM Enterprise can be installed on the same machine as the Swyx server, however we recommend that you speak to your system maintainer to see if there
would be any problems in doing this.
If you have to install TIM Enterprise on to another machine on the network, we advise that you setup a network share for the following directory: \program files\tri-line\tim enterprise\spool. You then need to map a network drive on the Swyx server machine to this path. |
Configuring your SMDR
By default the CDR information is output to a file. This will need to be changed so the CDR data is outputted to a specific file and specific destination. To do this you will need to have access to the SwyxWare Administration tool. Below you will see the steps to configure the SwyxWare to output the CDR file:
- Login to your SwyxWare Administration tool.
- Right-click on the Swyx server you want to configure and click on the button.
- Now, you should be able to see the properties window, click on the tab.
- Click on the Call Detail Records into Text File radio button.
- In the Save to Folder field enter in the following: \program files\tri-line\tim enterprise\spool\. If you are using a mapped driver enter in the driver letter.
- In the File Name field enter the following: data.{sitecode}. You can check the site code by browsing to TIM Enterprise, click on the tab and hover over the site and the site code will appear.
- Click on the button and close the SwyxWare Administration tool.
Below, you can find an example of the SwyxWare Administration properties window:

Configuring TIM Enterprise
Below you will find steps on how to configure TIM Enterprise to listen for SMDR data from your SwyxWare:
- Browse to TIM Enterprise as normal and login with your credentials.
- Click on the tab.
- Go the the point in the Directory where you need to add the PBX Object and add a PBX with the name 'SwyxWare'.
- Left-click on it and select .
- From the settings tab select SwyxWare from the PBX model list.
- In the tab select No connection required from the Connection method list.
- Finally, click on the button.

