These instructions help you configure your Cisco UCM to work with TIM Plus. Contact your system maintainer if you are not familiar with the configuration of your PBX.
Connection Type
Support Files
Required Tasks
Configure the SMDR output
This version of the Cisco UCM stores its call records in a Microsoft SQL Server database. However, by default, this functionality is not enabled. To enable it, the following settings must be configured on the Publisher using the Service Parameters configuration window:
- CDR Enabled
- CDR Log Calls With Zero Duration Flag
- Call Diagnostics Enabled
This version of the UCM outputs its call records to a table named CallDetailRecord in a database entitled CDR. Rather than have TIM Plus read and remove CDRs from the live CallDetailRecord table, we recommend you replicate this into a second table - leaving the original intact - so that it may be used by other applications that require it. Normally, there already exists a SQL User with the following credentials:
- Username: CiscoCCMCDR
- Password: dipsy
To set up replication you may need to speak to your database administrator or your Cisco UCM maintainer. Ensure that the SQL user described above has full access rights to this replicated table.
You need to know the following information in order for TIM Plus to be able to connect to the Cisco UCM CDR database:
- The IP address or hostname of the Microsoft SQL Server database located on the Publisher node.
- The username and password to connect to the CDR database.
Setting up a DSN connection for TIM Plus
To enable TIM Plus to work with your Cisco UCM, you first need to set up a DSN connection. Follow the steps below to perform this task within Microsoft Windows:
- Open Windows Control Panel
- Double click on the icon
- Double click on the icon
- Select the tab and click the button
- Select SQL Server from the list of available drivers and click
- In the Name field, enter CCM
- In the Description field enter the following: TIM Plus link to CCM
- In the Database name field enter the database type e.g SQL, MySQL etc.
- In the Server drop-down list select the Cisco UCM Publisher IP address or machine name
- Click the button
- Select the option With SQL Server authentication using a login ID and password entered by the user , then click
- Enable the checkbox Change the default database to: , select CDR , then click the button
- Click the button
- Click the button to verify your settings and, if the test is successful, click
- Click the button to close the control panel applet
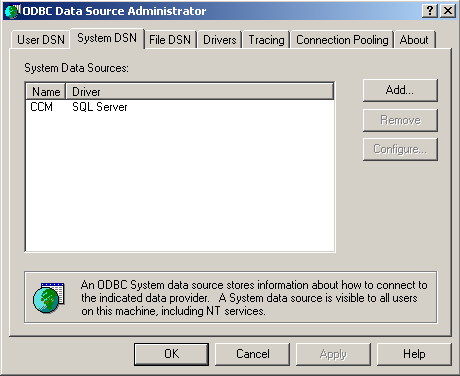
An example of an ODBC setup is shown below:
Configuring TIM Enterprise
These instructions should assist in configuring your Cisco UCM to work with TIM Enterprise. If you are not familiar with PBX configuration, please contact your system maintainer.
| Connection information | Description |
|---|---|
| Connection type | IP |
| IP method | The Cisco UCM stores its Call Detail Records in a MS SQL database which is located on the Publisher. |
Configuring Cisco Unified Call Manager
By default the CDRs are not written to the MS SQL Database. The following 'Service' parameters need to be enabled on the Publisher using the Service Parameters Configuration window:
- CDR Enabled
- CDR Log CallsWith Zero Duration Flag
- Call Diagnostics Enabled
The database that TIM Enterprise will connect to what is called 'CDR'. Within this database there is a table called 'CallDetailRecord'. Rather than TIM Enterprise reading and removing data from the 'CallDetailRecord' table we highly recommend that you setup a second table which is a replication of the 'CallDetailRecord' table. This leaves the original table intact and can be used by other applications that may require it. There should be a SQL User already created with the following credentials:
- Username: CiscoCCMCDR
- Password: dipsy
To setup replication you will need to speak to your Database Administrator or your Cisco UCM maintainer. The replicated table name should be called 'calldetailrecord2'.
Please make sure that when the replication is setup that the above user has full access to the new table.
You will need to know the following information for TIM Enterprise to connect successfully to the Cisco UCM CDR database:
- IP/DNS of the MS SQL Database which is located on the Publisher.
- Username and Password to connect to the CDR database (you may need to speak to your maintainer about this).
Setting up a DSN connection for TIM Enterprise
You will need to setup a DSN connection for TIM Enterprise to work with the Cisco UCM. Below you will find instructions on how to do this within Microsoft Windows:
- Click on Windows .
- Click on .
- Double click on icon.
- Double click on icon.
- Click on the tab.
- Click on the button.
- Select SQL Server from the list and click .
- In the Name field enter the following: CCM.
- In the Description field enter the following: TIM Plus link to CCM.
- In the Database name field enter the database type e.g SQL, MySQL etc.
- In the Server drop-down list select the Cisco UCM Publisher IP address or machine name.
- Click on the button.
- Click on the radio button With SQL Server authentication using a login ID and password entered by the user and click on the button.
- Click on the check box Change the default database to: and select CDR and then click on the button.
- Click on the button.
- Click on the button and once you make sure the test is completed successfully, click on the button.
- Now click on the button.
Now you will be able to see the CCM in the list.
An example of ODBC setup is shown below:

Configuring TIM Enterprise
Below you will find steps on how to configure TIM Enterprise to listen for SMDR data from your Cisco UCM 4.0:
- Browse to TIM Enterprise as normal and login with your credentials.
- Click on the tab.
- Go the the point in the Directory where you need to add the PBX Object and add a PBX with the name 'Cisco UCM 4.0'.
- Left-click on it and select .
- From the settings tab select Cisco UCM v4 DSN from the PBX model list.
- In the tab select System DSN connection from the Connection method list.
- The DSN connection details should be automatically picked up.
- Finally, click on the button.

