These instructions help you configure your Alcatel OmniPCX Office phone system to work with TIM Plus. Contact your system maintainer if you are not familiar with the configuration of your PBX.
Connection Type
Support Files
Required Tasks
Configuring your SMDR output
Follow the instructions below to configure the SMDR output for your Alcatel OmniPCX Office phone system:
Alcatel-Lucent OmniPCX Office Communication Server supports two types of call metering:
- V24 metering supports V24 printing for all call metering tickets
- IP metering supports IP printing for call metering tickets originating from a 3rd party application (Business or Hotel) via an IP connection
The type of metering must be specified when the Office Link driver is installed. The driver can be set to one of two modes: hotel or metering. You can use the OMC Counting function to specify the type of call metering for hardcopy printouts.
To set printing options for call metering tickets, follow the steps below:
- Open the Counting function window in the OMC console and select the tab.
- Select the metering type from the drop-down list: Ext. Accounting Activation IP or Ext. Accounting Activation V24.
- Click to save the settings.
The table below presents a summary of the data output from an Alcatel:

Installing the Alcatel Office Link Driver
If your Alcatel OmniPCX Office has been configured to send SMDR data via IP, you first need to install the Alcatel Office Link Driver to configure the output.
For information on how to install the Alcatel Office Link Driver, please refer to the Alcatel OmniPCX Office manual or speak to your system maintainer.
Setting up a DSN connection for TIM Plus
To enable TIM Plus to work with the Alcatel Office Link Driver, you need to setup a DSN connection. Follow the instructions below to perform this operation within Microsoft Windows:
- Open Windows Control Panel
- Double click on the icon.
- Double click on the icon.
- Click on the tab.
- Click on the button.
- Select Native from the list of drivers and click .
- In the Name field enter: TIM Enterprise - Alcatel OHL.
- In the Database name field enter: Native.
- Click on the button, then close the window.
An example of an ODBC setup is shown below:

Configuring TIM Enterprise
Once the DSN connection has been set up, log in to TIM Enterprise and perform the following steps:
- Click on the tab.
- Choose the PBX object you want to configure and click Properties.
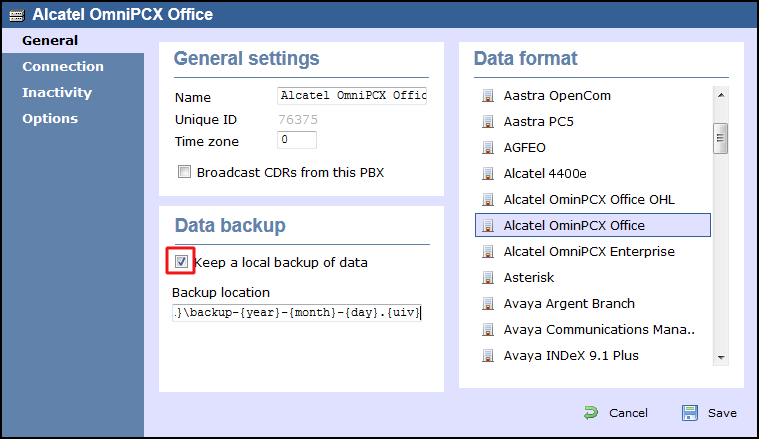
- A new window will open. In the tab, select Alcatel OmniPCX Office from the Data format list and tick the Keep a local backup of data box, as shown below:
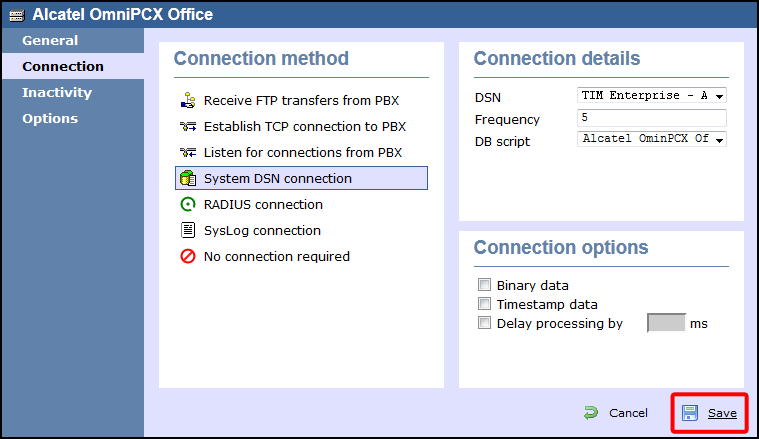
- In the tab, select System DSN connection from the Connection method list.
- In the DSN field, select TIM Enterprise- Alcatel OHL from the drop-down list.
- In the Frequency field, enter 5 to check for data every five seconds.
- In the DB script field, select Alcatel OmniPCX Office OHL from the drop-down list.
- Click on the button to apply the settings.