The Target Response report
Introduction
The Target Response report allows you to quickly assess how well calls to your company as a whole (or individual departments or sites) are answered compared to user-defined targets.It provides a line-by-line summary of each day along with a visual indicator showing what percentage of calls were answered inside and outside your set target. The default target answer time is 10 seconds, and this can be changed, to suit your requirements.
Running the report
On the Reports screen, click on Target Response in the reports list and then press the button.

A new window will appear, where you can select the criteria for your report.
Selecting the reporting period
Every report requires a period to run over. This is generally defined as the "Reporting period".
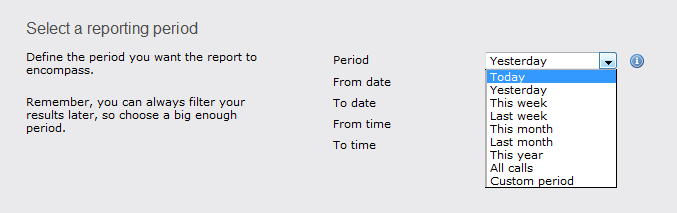
There are several preset periods that can be selected from a drop-down list. The predefined periods are based on a standard Gregorian calendar and are defined as follows:
| Period | Description |
|---|---|
| Today | The start and end dates are set to the current date. The start time is set to 00:00:00 and the end time to 23:59:59. |
| Yesterday | The start and end dates are set to the current date minus one day. The start time is set to 00:00:00 and the end time to 23:59:59. |
| This week | The start date is set to the first day (normally Monday) of the current week. The end date is set to the current day. The start time is set to 00:00:00 and the end time to the current time. |
| Last week | The start date is set to the date of the last Monday, and the end date is set to the start date plus seven days. The start time is set to 00:00:00 and the end time to 23:59:59. |
| This month | The start date is set to the first day of the current month. The end date is set to the current day. The start time is set to 00:00:00 and the end time to the current time. |
| Last month | The start date for this period is set in three stages. The day is set to 01, the month is set to the current month minus one, or in the case of January, it is set to 12. The year is set to the current year, unless it is a new year, in which case the year is reduced by one. The start and end times are set to 00:00:00 and 23:59:59 respectively. |
| This year | The start date is set to the first day of the first month of the current year, whilst the end date is set to today's date. The start and end times are set to 00:00:00 and 23:59:59 respectively. |
| All calls | The start and end dates and times are set to the date and time of the first and last call in the entire call database, respectively. |
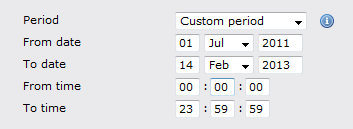
| Custom period | Enter the start and end dates and times into the boxes below. The start and end times are linked to their respective dates. |
If you want to be more specific, you can choose the Custom period from the drop-down list. This option will allow you to define the Start date and End date yourself, as well as the Start time and End time of the calls you want to report on.
When the report is executed, the reporting engine will substitute the start and end dates based on the current date or the relevant selection made by the user.
Once you have set the report's period, click on thebutton to set more of the report's parameters or select thebutton to run the report.
Selecting the reporting entity
The reporting entity paramater allows you to select which part of your organisation you want to run the report for (site, extension group, channels or individual extensions).
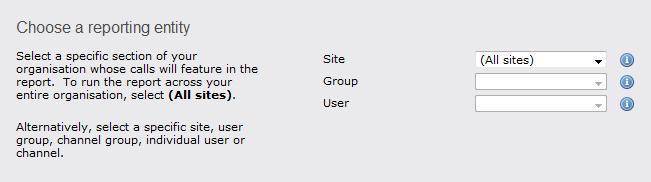
Site
TIM Plus will allow you to log information from up to five sites. If you want to report on a particular site, select your preferred site from the drop-down list, alternatively leave the default settings as All sites.
The username and password you have been allocated might be restricted to a specific site or group. If you need additional permissions, please contact your system administrator. |
Group
There is no limit to the number of groups you can create on one site. Groups, like sites are available as a drop-down list. You can choose to report on a specific group or leave the default setting as All groups.
Please note that the drop-down list for each group will appear only if a site has already been selected.
User
Once a site and group has been selected, you can also choose to report on a particular user from the drop-down list, or you can leave the default setting as All users.
Once you have set the report's entities, click on thebutton to set more of the report's features or select thebutton to run the report.
Selecting the report filters
This option allows you to filter out certain calls from your results, by selecting the values of the parameters.
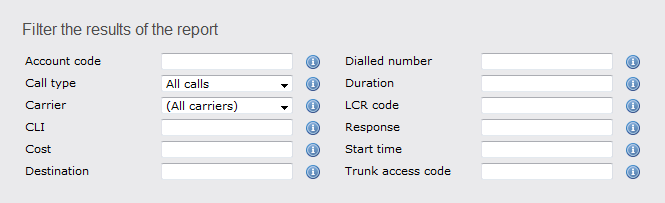
These filters allow you to be very specific, when deciding the call information you would like to display in the final report.If you do not want to select any filters, simply press thebutton to skip.
Please find a brief description of all filters below:
Account code
If you want to produce a bill consisting of all chargeable calls made using a particular account code, enter this code in the field provided.
To report on more than one account code, you can use a comma to separate the entries.
Call type
This filter allows you to define the type of call you would like to report on. If you would like to report on all calls, leave the default setting as All calls.
If you want to report on one call type in particular, expand the drop-down list and select from the available options.
Carrier
If you use more than one carrier, you can choose which carrier's calls to report on. To report on all calls from all carriers, leave the default setting as All carriers.
If you only use one carrier, there will be no drop-down list available and no option to choose a different carrier.
CLI
The Caller Line Identification (CLI) is a phone number that calls your organisation. This is sometimes withheld by the person making the call.
You may choose to report on calls from a particular CLI or from numbers beginning with a particular CLI. For example, for calls from Tri-Line you would enter 02072652600.
This filter accepts the comparison operators ! and * (e.g. to exclude calls from Tri-Line, you would use !020726526*). To report on more than one CLI, user a comma to separate the entries.
Cost
If you want to add a filter for call costs, type in the cost you wish to define, as shown below.
This filter allows you to specify a range (-) or use comparison operators (>, <, ! and *).
Destination
If you want to filter calls to a specific, known destination, you can type the destination in the field provided. This filter accepts the comparison operators ! and *.
For example, if you want to exclude all calls to France, enter !France*, as shown below:
Dialled number
To filter calls to a specific number, type the number that was dialled in the box provided. The dialled number can be a number that you dial out, or a DDI number within your organisation that someone dials in to get to a particular extension.
To filter calls to a specific area, a partial number may be entered (e.g. 0033, for calls to France).
This filter accepts the comparison operators ! and * (e.g. to exclude calls to 0207 265, enter !0207265* ).
Duration
To filter calls above or below a particular duration, enter the number of seconds and the relevant symbol in the box provided. This filter allows you to specify a range (-) or use comparison operators (>, <, ! and *).
In the above example, the filter will look for calls longer than 1800 seconds (30 minutes). Alternatively, you may want to exclude calls below a certain threshold (e.g. below 3 seconds).
LCR code
If you are using Least Cost Routing (LCR), you may want to filter your results the by LCR code, in order to check a bill from your LCR provider. To do this, enter the LCR code in the box provided.
This filter accepts the comparison operators ! and * (e.g. to exclude a specific LCR code, add the code with the required operators !162*)
Response
This option allows you to filter calls based on their response time.The results will be filtered according to the response time threshold that you define in the provided field. The threshold you specify will be measured in seconds.
In the above example, the search results will display calls that have a response time above 10 seconds.
Start time
This option allows you to filter calls based on the start time of the call, which is basically the time of day the call started. Enter your preferred start time in the field provided, using the following format hh:mm:ss.
For example, if you want your results to include calls logged after 10 a.m. only, you need to enter 10:00:00 in the Start time field, as shown below:
Trunk access code
If you want to filter your results by a trunk access code, enter this in the field provided. For example, to exclude all calls with access code 9, add !9 in the filed provided.
This filter accepts the comparison operators ! and *.
Selecting the report options
This section allows you to further narrow down your report results, by excluding certain types of calls or sorting the results in a particular manner. The filters are fairly self-explanatory. For example, if you would like to exclude weekend calls from the report, simply tick the option to exclude weekend calls. If you would like to ignore missed calls shorter than a specific duration, simply enter the duration in the box.
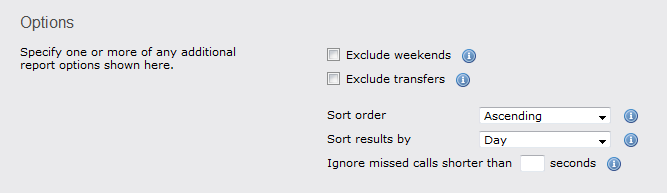
Exclude weekends
If you would like to exclude weekend calls from the search results, simply select the tick-box to exclude weekend calls.
 Exclude weekends
Exclude transfers
Select this option if you would like to exclude transfers from the search results. For example if you want to see only how well calls were answered when first presented, you would choose to exclude transfers.
Exclude transfers
Hide unused
This option allows you to exclude unused extensions from the results shown.
Hide unused
Include internal
Tick this box if you want the report results to include the response time of the internal calls.
Include internal
Thresholds
Use this option to define the threshold for your response time. The example below will show the response times for calls answered within 5, 10 and 20 seconds, respectively.
Sort order
Expanding the drop-down list available, you can choose whether you would like the results of the report to appear in ascending or descending order.
Sort results by
You may choose the order in which results are sorted by selecting the appropriate option from the list provided:
Ignore missed calls shorter than
If you would like to exclude short calls from your report, enter the duration below which you'd like to ignore calls. If you would like to exclude very short calls (e.g. calls below 3 seconds), simply enter the number 3 in the box provided:

Selecting the report format
This section allows you to choose the output format of your report. To select the desired format, click on the drop-down list and choose from the available options: Web, PDF, Excel, CSV and XML. More details about each report format are available in the Setting the report format section above.
Creating the report
When you have chosen a reporting period, and are happy with your selections, you have two options:
- run the report now
- schedule the report for future delivery
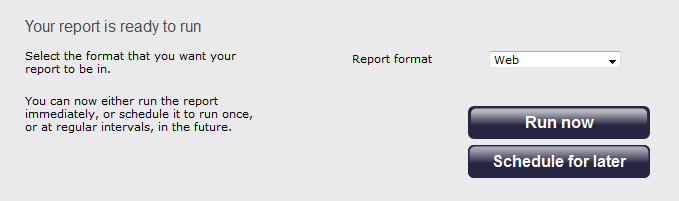
If you click on the button, the report will run instantly in your chosen format.
If you want to schedule the report to run at a later time, follow the instruction given in the Schedule a report section.
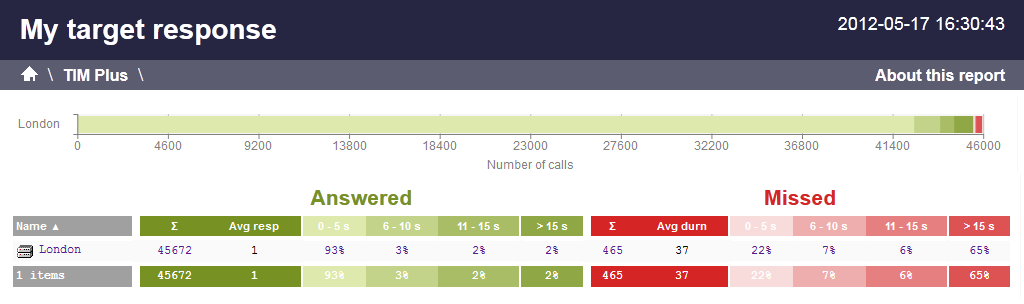
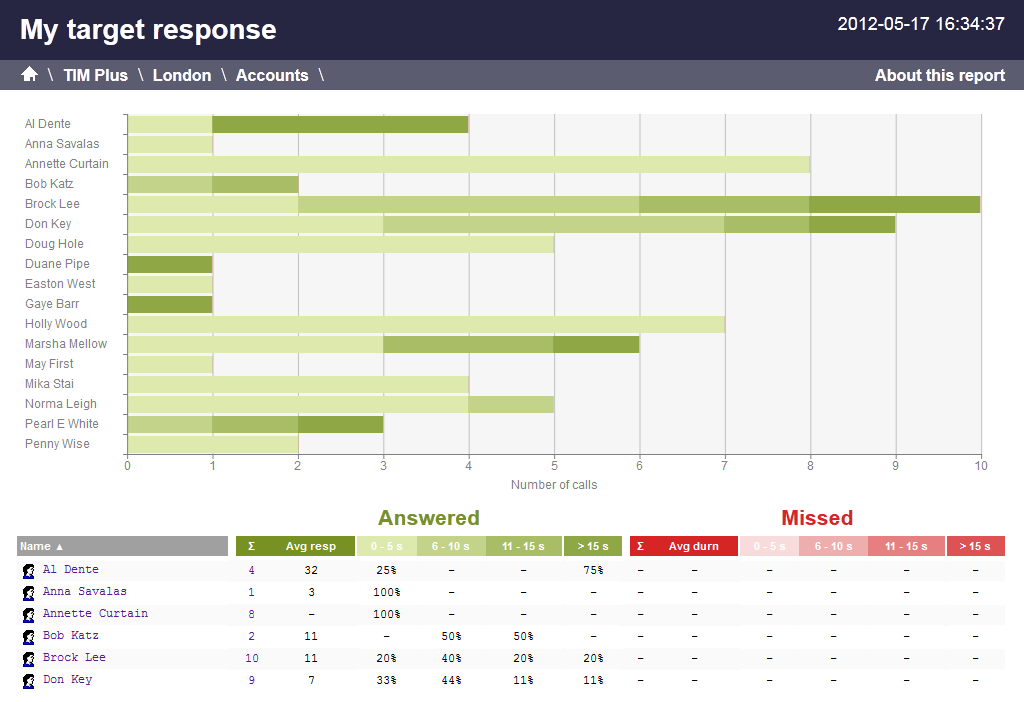
The report's results
When selecting WEB as the output format, this report will appear as below. To view details of any filters or selection parameters used in creating this report, simply click on About this report on the top-right corner of the page.
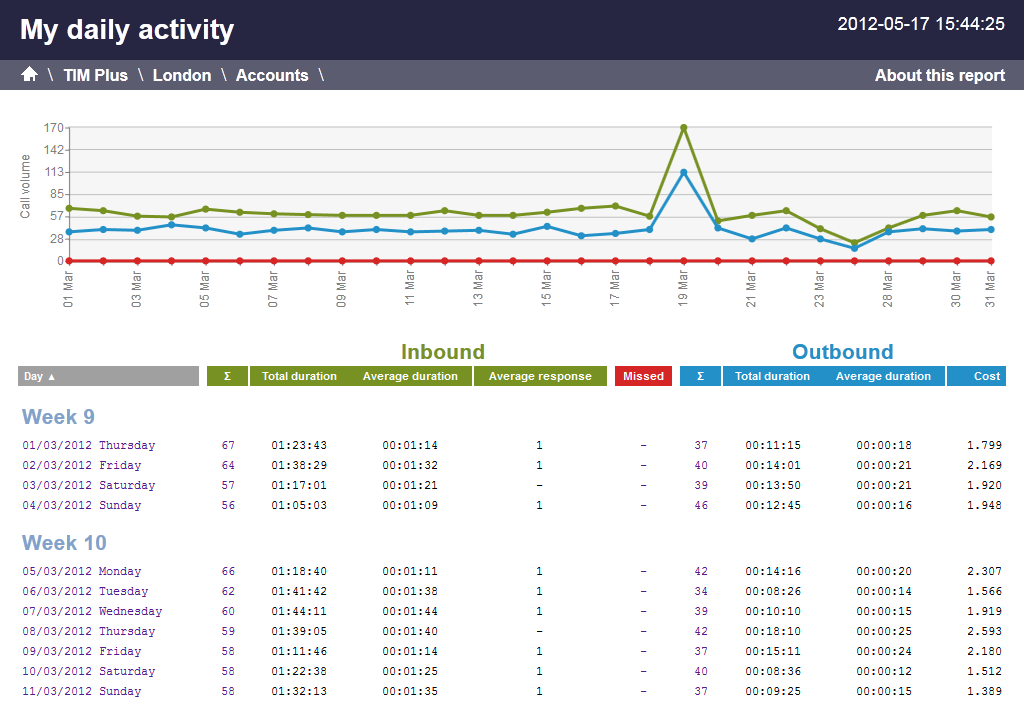
As with all reports, the header of the report includes:
- the report title
- the date and time of the report
- the name of the report, if applicable
The WEB format allows for complete flexibility when viewing any report. All headers are clickable, allowing you to re-arrange the report layout in seconds, to sort the calls in ascending or decending order based on the header clicked.
The body of the report consists of a table showing a summary of the handling of your incoming calls on each day during the period you selected. Each line (or day) shows the following information:
| Header | Description |
|---|---|
| Name | This column tells you which entity the data displayed refers to, e.g site, department user etc. |
| Answered | The answered calls columms are always displayed in shades of green. You can re-arrange based on any of the following selection criteria. You can click on each header to re-order from ascending to descending and vise versa.
|
| Missed | The missed calls columns are always displayed in shaeds of red. You can re-arrange based on any of the following selection criteria. You can click on each header to re-order from ascending to descending and vise versa.
|
 : The total volume of calls received for the entity shown.
You may keep drilling down into the report for more detail e.g. to see which teams are responsible for low responses and drill down further to see which individuals in the team perform worse.
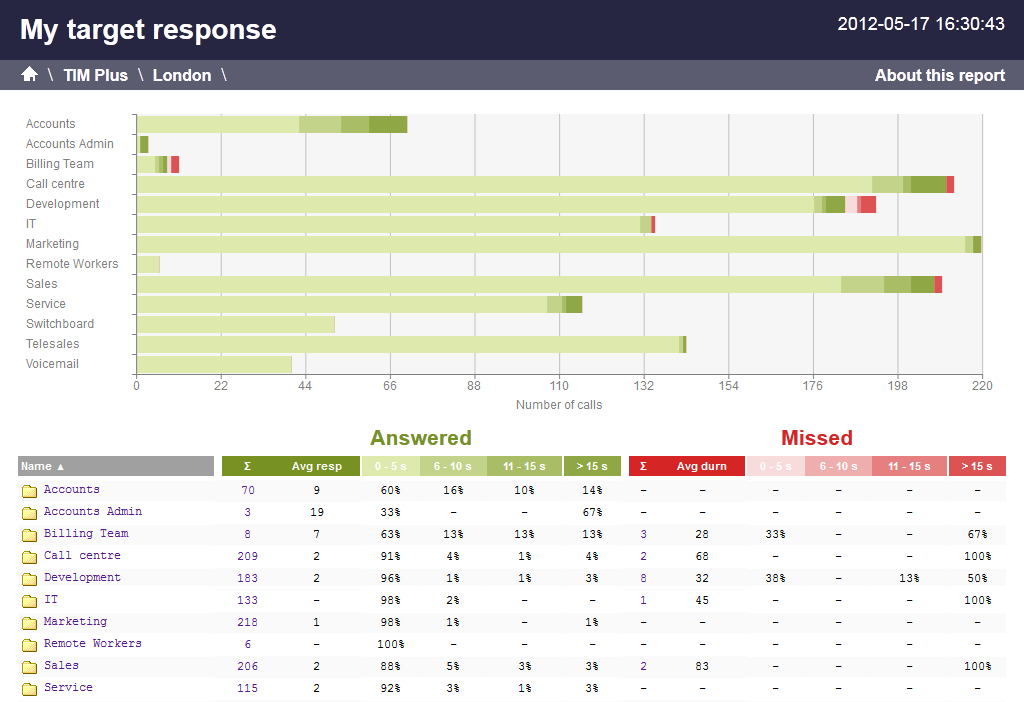
Then drill down further for to see details of which users are letting the team down.
Introduction
This report allows you to quickly assess how well a group of extensions (or your whole organisation) is answered incoming calls within a pre-determined target. It provides a line by line summary of each day (including or excluding weekends) along with a visual indicator showing what percentage of incoming calls were answered within your desired target. The default target answer time is 10 seconds, and this can be changed to suit your requirements.

Running the report
On the Reports screen, click on Target response in the reports list and then press the button.

The following report selection criteria window appears:
Reporting period
Every report requires a period to run over. This is generally defined as the "Reporting period".

There are several pre-defined periods that can be selected from a simple drop-down list as shown above.
The built-in periods are based on a standard Gregorian calendar and are defined as follows:
| Period | Description |
|---|---|
| Today | The start date and end date is set to the current date. The default start time is set to 00:00:00 and the end time to the current time. |
| Yesterday | The start date and end date is set to the current date minus one day. The start time is set to 00:00:00 and the end time to 23:59:59. |
| This week | The start date is set to the Monday of the current week, whilst the end date is set to the current day. The default start time is set to 00:00:00 and the end time to the current time. |
| Last week | The start date is set to the last Monday, whilst the end date is set to the start date plus seven days. The start time is set to 00:00:00 and the end time to 23:59:59. |
| This month | The start date is set to the 1st day of the current month and the end date to today. The default start time is set to 00:00:00 and the end time to the current time. |
| Last month | The start date for this period is set in three stages. The day is set to 01, the month is set to the current month minus one, or in the case of January, it is set to 12. The year is set to the current year, unless it is a new year, in which case the year is reduced by one. The start and end times are set to 00:00:00 and 23:59:59 respectively. |
| This year | The start date is set to the first day of the first month of the current year. The end date is set to today's date. The start and end times are set to 00:00:00 and 23:59:59 respectively. |
| All calls | The start date is set to the date of the first call in the database, whilst the end date is set to the date of the most recent call in the database. Times are also set to the times of the first and last calls in the database. |
| Custom period | Enter the start and end dates and times into the boxes below. The start and end times are linked to their respective dates. |
If you want to be more specific, you can choose the Custom period from the bottom of the drop-down list. This option will allow you to define the start date and end date yourself, as shown below. When you need to be even more specific, you can also choose a start time and end time.

When the report is executed, if the user has selected an in-built period, the reporting engine simply substitutes the start and end dates based on the current date and the period the user selected.
Once you have set the report's period, click on the button to set more of the report's features or select the button to run the report.
What do you want to report on?
In addition to the reporting period, each report offers you the opportunity to define exactly what you want to report on. This is generally a site, group or user.
Site

TIM Plus will allow you to log information from up to five sites. If you want to report on a specific site, select that site from the drop-down list or to select all sites' data, leave it at the default All sites as shown above.
| NOTE: The username and password you have been allocated may mean you are restricted to specific sites or groups. If you have any difficulty accessing other sites or group, please contact your system administrator and check that access has been enabled. |
Group

There is no limit to the number of groups available on each site. Groups, like sites are available as a drop-down list. You can choose to select a specific group or leave at the default All groups. Please note that the drop-down list for each group can only appear if a site has already been selected.
User

Once a site and group has been selected, you can decide whether you would like to report on all users or select a particular user from the drop-down list as shown above.
Once you have set the report's entities, click on the button to set more of the report's features or select the button to run the report.
Filter call information

You have the option of filtering the information, based on a number of call filters. These filters allow you to be very specific, when deciding the call information you would like in the final report.
If you do not want to select any filters, simply press the button to skip.
Please find a brief description of all filters below:
Account code
If you want to produce a bill consisting of all chargeable calls made using a particular account code, enter the account code in this filed. To report on more than one account code, simply comma separate.

Call type
This filter allows you to define the type of call you would like to report on. If you would like to report on all calls, leave at the default All calls.

Carrier
If you use more than one carrier, you can choose which carriers calls you would like to report on.
To report on all calls from all carriers, leave at default.
If you only use one carrier, there will be no drop-down list available and no option to choose a different carrier.

CLI
The Caller Line Identification (CLI) is the number associated with the incoming call. This is sometimes withheld by the person making the call.
You may choose to report on calls from a particular CLI or from numbers beginning with a particular CLI by entering the number in here. For example, for calls from Tri-Line you would enter in "02072652600". This filter accepts the comparison operators ! and *, e.g. to exclude calls from Tri-Line use "!020726526*".
To report on more than one CLI, simply comma separate.

Cost
If you want to add a filter for call costs, simply type in the cost you wish to define as shown nearby and add the appropriate above, below and between symbol . This filter accepts range (-) and comparison operators (>, <, ! and *).

Destination
If you want to filter calls to a specific destination and that destination has been added to your locations field, simply type the destination in here. This filter accepts the comparison operators ! and *, e.g. to exclude all calls to France use "!France*".

Dialled number
To filter calls to a specific number, type the number in the dialled number field. To filter calls to a specific area, a partial number may be entered here e.g. "0033" for calls to France. This filter accepts the comparison operators ! and *, e.g. to exclude calls to 0207 265, enter "!0207265*".

Duration
To filter call above or below a particular duration, simply enter the number of seconds and the relevant symbol. This filter accepts range (-) and comparison operators (>, <, ! and *).
In the example nearby, the filter will look for calls above 1800 seconds (30 minutes). Alternatively you may want to exclude calls below a certain threshold e.g. below 3 seconds.

LCR code
If you are using Least Cost Routing (LCR), you may want to filter by LCR code in order to check a bill from your LCR provider. To do this simply enter the LCR code in the LCR field. This filter accepts the comparison operators ! and *, e.g. to exclude a specific LCR code, simply add as follows "!162*".

Response
This filter allows you to filter based on the response times to calls. You have the option of filtering for calls above or below a threshold. You can define this threshold in the box alongside.
The figure relates to seconds. e.g. the example nearby shows 10 seconds. By selecting from the drop-down list, you will be able to filter calls that took more than 10 seconds to answer or see calls answered in less than 3 seconds.

Start time
This filter allows you to filter calls based on the start time. This is the time of day when the call started in the format hh:mm:ss, e.g. if you want calls after 8 a.m. only, then enter the start time in as "08:00:00" as shown nearby.

Trunk access code
If you want to filter by Trunk access code, simply enter the Trunk access code in this field. This filter accepts the comparison operators ! and *. The * is not needed if it's an exact match, so the 9 for TAC should just be "!9", e.g. to exclude all calls with access code 9, add "!9" to the TAC field.

Specific Options

This section allows you to add more specific filters to your report. The filters are fairly self-explanatory. If you would like to exclude weekend calls from the report, simply tick the option to exclude weekend calls. If you would like to ignore missed calls shorter than a specific duration, simply enter the duration in the box. In the example above, a filter has been added to exclude weekends and any calls shorter than 3 seconds.
Exclude weekends
This option gives you the option of excluding weekend calls from any results shown. If you would like to exclude weekend calls, simply select the tickbox to exclude weekend calls.

Exclude transfers
Select this option if you would like to exclude transfers when running a report. For example if you were running an incoming call analysis report and wanted to see only how well calls were answered when first presented, you would choose the option on excluding transfers.

Hide unused
This option gives you the option of excluding unused extensions from the results shown. To exclude unused extension, simply tick the box as shown below:

Include internal
.........................................................................................................................

Thresholds
When running a report like, for example a target response report, you may want to define your own thresholds. You can do this by entering the response thresholds you want to report on in seconds as shown below. This will show the response times for calls answered within 5, 10 and 20 seconds, respectively.

Sort order
Choose whether you would like the results of the report to appear in ascending or descending order, by selecting from the drop-down box.

Sort results by
You may choose the order in which results are sorted by selecting the appropriate option from the list shown below:

Ignore missed calls shorter than
If you would like to exclude short calls from your report, enter the duration below which you'd like to ignore calls. If you would like to exclude very short calls, e.g. calls below 3 seconds, simply enter the number '3' in the box, as shown here.

Creating the report
When you have chosen a reporting period, and are happy with your selections, you have two options:
- Run the report now
- Schedule for future delivery

To choose your preferred option, select the appropriate button.
If you choose to run the report now, click the button. The results will appear immediately in your chosen format.
To schedule the report for delivery at a later date, follow the instruction given on the Schedule a report section.
Target response - The results
When selecting Web as the output format, this report will appear as below.
The Web format allows for complete flexibility when viewing any report. To view details of any filters or selection parameters used in creating this report, simply click on About this report at the top right of the page.
As with all reports, the header of the report includes the report title, any name you may have given to it, and the date and time it was run.
All headers are clickable allowing you re-arrange the report layout in seconds, to sort the calls in ascending or decending order based on the header clicked.
The report includes the usual headings, including the report's title, any Friendly Name you assigned to it, the period of the report, and any options you selected in the report's selection criteria window.
The body of the report consists of a table showing a summary of the handling of your incoming calls on each day during the period you selected. Each line (or day) shows the following information:
| Header | Description |
|---|---|
| Name | This column tells you which entity the data displayed refers to, e.g site, department user etc. |
| Answered | The answered calls columms are always displayed in shades of green. You can re-arrange based on any
of the following selection criteria. You can click on each header to re-order from ascending to descending and vise versa.
|
| Missed | The missed calls columns are always displayed in shaeds of red. You can re-arrange based on any of the following selection
criteria. You can click on each header to re-order from ascending to descending and vise versa.
|
You may keep drilling down into the report for more detail e.g. to see which teams are responsible for low responses and drill down further to see which individuals in the team perform worse.

Then drill down further for to see details of which users are letting the team down.

NOTE: You can change the default response thresholds appearing on your headers, by adding a Threshold option while creating your report. |
If you would like to go back and view any report for a larger section of the organisation, simply click on the appropriate link in the breadcrumb as shown below:
