The Busy Times report
Introduction
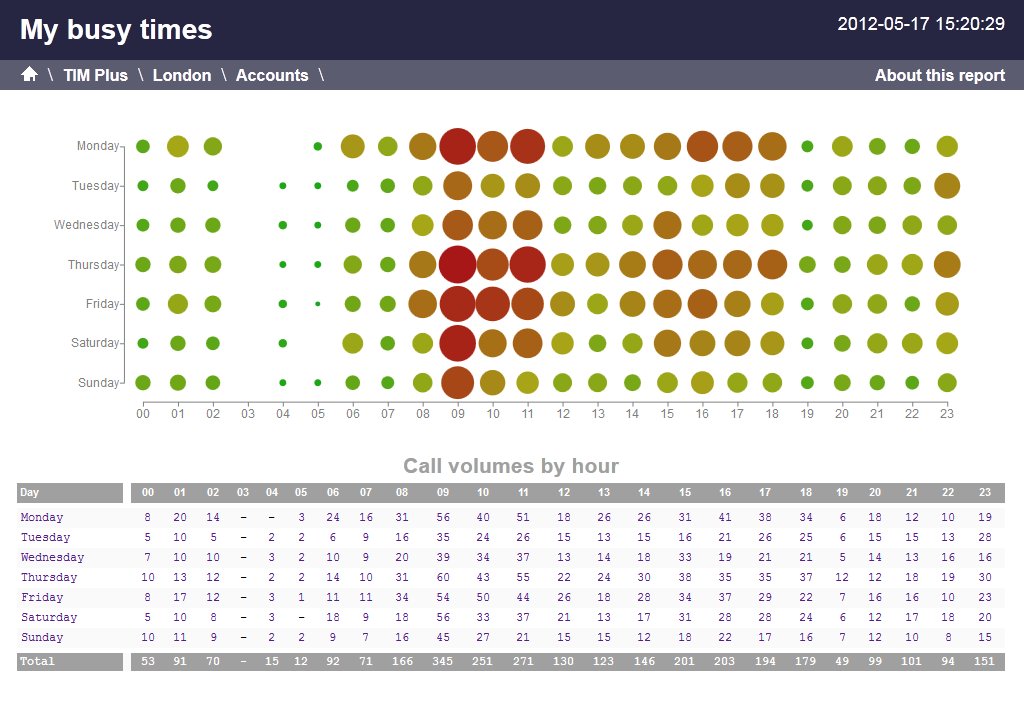
The Busy Times report provides a clear, hour-by-hour graphical representation of your call volumes for each day, allowing a detailed breakdown of calls by type for any particular time slot selected. This report is ideal for identifying call traffic trends and very quickly highlights your busy days and times, allowing you to more effectively plan your staffing requirements.
Running the report
On the Reports screen, select the Busy times report from the left-hand pane and click thebutton.

A new window will appear, where you can set the parameters of your report.
Selecting the reporting period
For each report, you must specify a time span that covers the calls you want the report to include. This is known as the "reporting period".
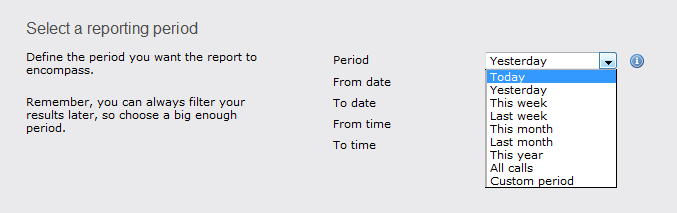
There are several preset reporting periods available for selection, based on the standard Gregorian calendar. The following table describes how the start and end times are defined for each preset period:
| Period | Description |
|---|---|
| Today | The start and end dates are set to the current date. The start time is set to 00:00:00 and the end time to 23:59:59. |
| Yesterday | The start and end dates are set to the current date minus one day. The start time is set to 00:00:00 and the end time to 23:59:59. |
| This week | The start date is set to the first day of the current week (normally Monday). The end date is set to the current day. The start time is set to 00:00:00 and the end time to the current time. |
| Last week | The start date is set to the date of the last Monday, and the end date is set to the start date plus seven days. The start time is set to 00:00:00 and the end time to 23:59:59. |
| This month | The start date is set to the first day of the current month. The end date is set to the current day. The start time is set to 00:00:00 and the end time to the current time. |
| Last month | The start date for this period is set in three stages: The day is set to the first day of the month. The month is set to the previous month. The year is set to the current year, unless it is currently January, in which case, the previous year is used. The start and end times are set to 00:00:00 and 23:59:59 respectively. |
| This year | The start date is set to the first day of the first month of the current year, whilst the end date is set to today's date. The start and end times are set to 00:00:00 and 23:59:59 respectively. |
| All calls | The start and end dates and times are set to the dates and times of the first and last call in the entire call database, respectively. |
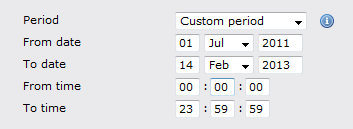
In addition to the presets described above, it is possible to specify a custom reporting period by choosing Custom period from the Period drop-down list and specifying your own Start date, Start time, End date and End time of the period you want to report on.
Once you have set the reporting period, click on the button to set additional report parameters and options, or select the button to run the report immediately.
NOTE: Running this report over longer periods of time increases the reliability of its results. |
Selecting the reporting entity
The Reporting entity parameter allows you to select the part of your organisation whose calls the report should include, e.g. a site, a group or an individual user.
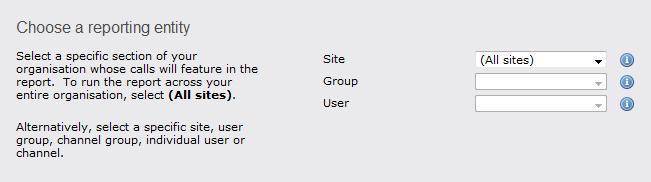
Site
To report on a particular site, select it from the drop-down list or select All sites .
Group
If a site has been selected, you are able to further limit the report's results by selecting a group from the drop-down list.
User
If both a site and group have been selected, you can further limit the report's results to include calls by a particular user by selecting it from the drop-down list.
If your web account is restricted to a specific site or group, only those entities to which you have access will be available in the drop-down lists. |
Once you have selected the scope of your report, click on the button to set additional report parameters and options. To run the report immediately without doing so, click the button.
Selecting the report filters
This option allows you to filter out certain calls from your results, by selecting the values of the parameters.
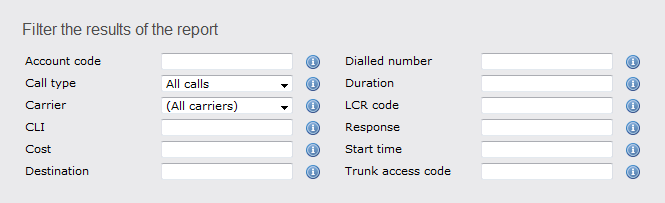
These filters allow you to be very specific, when deciding the call information you would like to display in the final report.If you do not want to select any filters, simply press thebutton to skip.
Please find a brief description of all filters below:
Account code
If you want to produce a bill consisting of all chargeable calls made using a particular account code, enter this code in the field provided.
To report on more than one account code, you can use a comma to separate the entries.
Call type
This filter allows you to define the type of call you would like to report on. If you would like to report on all calls, leave the default setting as All calls.
If you want to report on one call type in particular, expand the drop-down list and select from the available options.
Carrier
If you use more than one carrier, you can choose which carrier's calls to report on. To report on all calls from all carriers, leave the default setting as All carriers.
If you only use one carrier, there will be no drop-down list available and no option to choose a different carrier.
CLI
The Caller Line Identification (CLI) is a phone number that calls your organisation. This is sometimes withheld by the person making the call.
You may choose to report on calls from a particular CLI or from numbers beginning with a particular CLI. For example, for calls from Tri-Line you would enter 02072652600.
This filter accepts the comparison operators ! and * (e.g. to exclude calls from Tri-Line, you would use !020726526*). To report on more than one CLI, user a comma to separate the entries.
Cost
If you want to add a filter for call costs, type in the cost you wish to define, as shown below.
This filter allows you to specify a range (-) or use comparison operators (>, <, ! and *).
Destination
If you want to filter calls to a specific, known destination, you can type the destination in the field provided. This filter accepts the comparison operators ! and *.
For example, if you want to exclude all calls to France, enter !France*, as shown below:
Dialled number
To filter calls to a specific number, type the number that was dialled in the box provided. The dialled number can be a number that you dial out, or a DDI number within your organisation that someone dials in to get to a particular extension.
To filter calls to a specific area, a partial number may be entered (e.g. 0033, for calls to France).
This filter accepts the comparison operators ! and * (e.g. to exclude calls to 0207 265, enter !0207265* ).
Duration
To filter calls above or below a particular duration, enter the number of seconds and the relevant symbol in the box provided. This filter allows you to specify a range (-) or use comparison operators (>, <, ! and *).
In the above example, the filter will look for calls longer than 1800 seconds (30 minutes). Alternatively, you may want to exclude calls below a certain threshold (e.g. below 3 seconds).
LCR code
If you are using Least Cost Routing (LCR), you may want to filter your results the by LCR code, in order to check a bill from your LCR provider. To do this, enter the LCR code in the box provided.
This filter accepts the comparison operators ! and * (e.g. to exclude a specific LCR code, add the code with the required operators !162*)
Response
This option allows you to filter calls based on their response time.The results will be filtered according to the response time threshold that you define in the provided field. The threshold you specify will be measured in seconds.
In the above example, the search results will display calls that have a response time above 10 seconds.
Start time
This option allows you to filter calls based on the start time of the call, which is basically the time of day the call started. Enter your preferred start time in the field provided, using the following format hh:mm:ss.
For example, if you want your results to include calls logged after 10 a.m. only, you need to enter 10:00:00 in the Start time field, as shown below:
Trunk access code
If you want to filter your results by a trunk access code, enter this in the field provided. For example, to exclude all calls with access code 9, add !9 in the filed provided.
This filter accepts the comparison operators ! and *.
Selecting the report options
This section allows you to further narrow down your report results, by excluding certain types of calls or sorting the results in a particular manner.The filters are fairly self-explanatory. For example, if you would like to exclude weekend calls from the report, simply tick the option to exclude weekend calls. If you would like to ignore missed calls shorter than a specific duration, simply enter the duration in the box.

Exclude weekends
If you would like to exclude weekend calls from the search results, simply select the tick-box to exclude weekend calls.
 Exclude weekends
 Exclude transfers
Select this option if you would like to exclude transfers from the search results. For example if you want to see only how well calls were answered when first presented, you would choose to exclude transfers.
Exclude transfers Ignore missed calls shorter than
If you would like to exclude short calls from your report, enter the duration below which you'd like to ignore calls. If you would like to exclude very short calls (e.g. calls below 3 seconds), simply enter the number 3 in the box provided:

Selecting the report format
This section allows you to choose the output format of your report. To select the desired format, click on the drop-down list and choose from the available options: Web, PDF, Excel, CSV and XML. More details about each report format are available in the Setting the report format section above.
Creating the report
When you have chosen a reporting period, and are happy with your selections, you have two options:
- run the report now
- schedule the report for future delivery
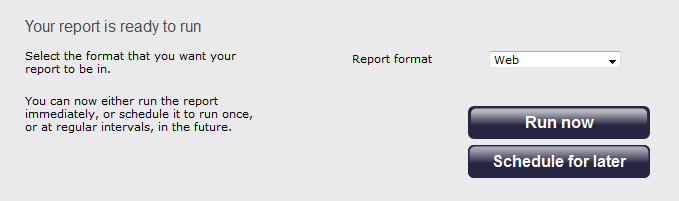
If you click on thebutton, the report will run instantly in your chosen format.
If you want to schedule the report to run at a later time, follow the instruction given in the Schedule a report section.
The report's results
When selecting WEB as the output format, this report will appear as below:-
As with all reports, the header of the report includes:
- the report title
- the date and time of the report
- the name of the report, if applicable
The WEB format allows for complete flexibility when viewing any report. All headers are clickable, allowing you to re-arrange the report layout in seconds, to sort the calls in ascending or decending order based on the header clicked. To view details of any filters or selection parameters used in creating this report, click on About this report on the top-right corner of the page.
The larger, darker red dots represent your busier periods, while the smaller greener dots, the quieter periods.
This report is truly interactive. To see how many calls for any period, simply float over it to see more details. Also, to see more details for any of the time slots, click on one of them, and details of all calls contained within this period are shown as follows:-
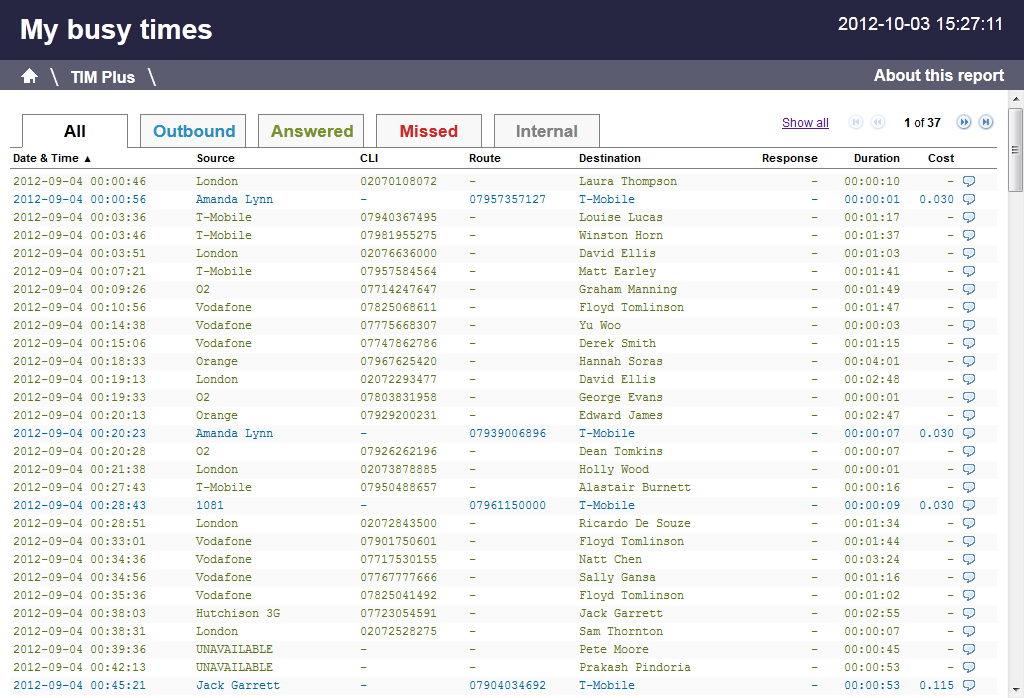
All calls are shown on the front page and clear colour coded tabs allow you to easily sort the results by call type (e.g. inbound, outbound etc.).
If you would like to go back and view any report for a larger section of the organisation, click on the appropriate link in the breadcrumb, as shown below:-
